Street View as a game engine: Adding 3D objects

This is the second post in the “Making of” series for my new web-based game, Finding Gustavo. In this series, I talk about the various techiques I used to turn Google Street View into a (sort of) game engine. While reading the post, it helps to be somewhat familiar with programming, ideally in JavaScript.
In the first post, we added localised sounds into the world of Street View, creating a sonic diegesis for our game. We can associate these sounds with objects we see in the Street View panoramic images - but what if we wanted to insert our own objects into the world? Street View is primarily an interactive viewer of 360-degree images. It doesn’t allow for modifying or augmenting these images very much, and for good reason: Google presents them as images of the real world, so people tampering with them could lead to all sorts of legal or moral issues. This is also why Google doesn’t actually allow the use of their own Street View imagery outside of the interactive viewer. Since we are clearly positioning our project as a game with a fictional narrative, I think we can get away with a little bit of cheeky augmenting, though.
We can use Three.js, a very popular JavaScript library, to render our 3D objects. Three has a great amount of documentation online, so I won’t attempt to explain how to use it in this post; I probably wouldn’t do a better job than the library authors. In a nutshell, we provide Three with a HTML <canvas> element, create our scene including meshes, materials and lights, and use Three’s WebGL renderer to draw on the canvas. We can even use the alpha option when creating the renderer, which gives us a transparent background. Now we have the following problems to solve:
- As the player travels through the world, how do we determine when the
<canvas>should appear? - As the player looks around, how do we position the
<canvas>on the screen so it always appears at the right position within the Street View panorama? - How do we rotate and scale the Three.js scene so the object is always oriented and sized correctly?
- How to make the object interactive?
Visibility and positioning
About 10 years ago, Rubén Béjar managed to insert a 3D Ferris wheel into a Street View panorama. This approach is quite impressive, because all the transformations (translation/rotation/scaling) are calculated manually. I am clearly a much lazier engineer than Rubén, so I searched for something in the Google Maps API I could exploit to “outsource” these calculations. The API has recently added support for 3D objects within 3D map views, but sadly not within Street View. The example in the docs - a giant 3D marker in the middle of a city - led me to look into different ways to customise markers in Street View, until I stumbled upon the InfoWindow.
The Info Window is a floating window that can be attached to a specific position on the map. Info Windows have been supported both in Maps and Street View for a long time. A typical
use case would be to display information about a place or a business at the given location. Helpfully, the content of an Info Window can be any arbitrary piece of DOM, including a <canvas> element. And even helpfullier, the Street View viewer shows, hides and moves the Info Window around so it stays anchored at its world position, instantly solving the first two of our problems. All we need to do is hide the default UI of the InfoWindow, including the header, background, borders etc. Most of it is achievable with some mildly hacky CSS:
/* this disables styling of GMaps Info Windows */
.gm-style .gm-style-iw-c {
  background: none;
  box-shadow: none;
  overflow: visible !important;
}

.gm-style-iw-tc {
  display: none;
}

.gm-style-iw-d {
  overflow: hidden !important;
}
We can cover the rest in our JavaScript:
import { WebGLRenderer } from 'three';

const canvas = document.createElement('canvas');
const renderer = new WebGLRenderer({ canvas, alpha: true, antialias: true });
// ...
// create our Three.js scene and camera
// ...
renderer.render(scene, camera);

const infoWindow = new InfoWindow({
  headerDisabled: true,
  position, // this can be a plain `{ lat, lng }` object
  content: canvas,
});

infoWindow.open({ map: panorama });
We now have a static 3D image floating at a specific point in out Street View world. As the player moves and looks around, it does not feel exactly “real” though. Plus, when we walk past it and look back, it’s facing us with the same side as before - that’s not how the real world works! We need to dynamically adjust the Three.js scene as the player’s position and orientation changes.
Adjusting rotation
The first issue to address is that the object’s rotation doesn’t change in local coordinates (i.e. within the Three.js scene), which means it changes in world coordinates (within Street View). When the player moves, we have to rotate our object around the Z axis by exactly the amount needed for it to compensate the rotation in world coordinates.
We use the same principle we implemented for localised sounds - the object’s rotation is a function of the player’s position (latitude + longitude). In the event handler for position_changed, we calculate the compensation amount using trigonometry:
panorama.addListener('position_changed', () => {
  const userPosition = panorama.getPosition();
  const objectPosition = infoWindow.getPosition();
  const dx = userPosition.lat() - objectPosition.lat();
  const dy = userPosition.lng() - objectPosition.lng();
  // rotate the Three.js Object so it always faces the same direction in the panorama
  object.rotation.y = Math.atan2(dy, dx);
  // re-render the scene
  renderer.clear();
  renderer.render(scene, camera);
});
One benefit of this technique is that we only call render when the position changes, instead of running a render loop at a certain frame rate. If we don’t need to animate the 3D scene,
this is quite sufficient. The rotation is still not quite perfect; in the real world, objects change their “relative rotation” when we turn our gaze sideways, too. We can stand still, but turning our head, we can see more or less of the static objects around us. However, this perceived rotation change is rather small and would be quite complex to implement, so I’ve decided to pragmatically leave it out. The key is to create the impression of objects being anchored in space - it does not have to be physically accurate.
Adjusting scale
Another issue comes up when the player approaches, or zooms in on the 3D object. Street View attempts to compensate for the zoom and ensure the Info Window stays the same size, which makes sense if it’s displaying text or images. In our case, the object should change size depending on the distance, as well as the zoom level, growing/shrinking with the objects in the panorama.
To address this, we can simply add a CSS transform onto our <canvas> - that way, we avoid re-rendering the 3D scene
and use the hardware-accelerated scaling which comes with the browser. We need to calculate the distance between the player
and the object using the same latLngDist function we used for localised sounds. We make the scale inversely proportional to the distance, which we scale by some amount (to get a natural-looking scaling progression as the player approaches the object). We then multiply the result by the zoom level, clamped to some kind of minimum value to avoid too much scaling.
const DISTANCE_FACTOR = 0.1;
const MIN_ZOOM = 0.8;

// The distance only changes when position changes,
// so we store its value for POV changes.
let dist = Infinity; // initial value

panorama.addListener('position_changed', () => {
  // ...
  // code from the previous snippet
  // ...

  dist = latLngDist(objectPosition, userPosition);

  const { zoom } = panorama.getPov();
  canvas.style.scale = (1 / dist) * DISTANCE_FACTOR * Math.max(MIN_ZOOM, zoom);
});

panorama.addListener('pov_changed', () => {
  const { zoom } = panorama.getPov();
  canvas.style.scale = (1 / dist) * DISTANCE_FACTOR * Math.max(MIN_ZOOM, zoom);
});
Adding interactions
Since our object is on a HTML canvas, it is straightforward to add a click event listener to it.
However, this includes clicking anywhere on the canvas, which is rectangular and occupies a lot of
the transparent space around the object. It would be counter-intuitive and potentially quite jarring
to trigger an interaction when the user clicks anywhere other than on the 3D object itself - especially
if the object is quite close by, the canvas could occupy most of the screen, blocking other interactions
such as clicking to move. We need a way to “filter out” pointermove events on the canvas which do not actually occur over
the rendered 3D object.
Raycasting to the rescue! Three.js includes a Raycaster class which, given a camera and a pointer vector (i.e. the player’s cursor coordinates relative to the canvas),
determines the intersections between the pointer and any objects in the scene. If the raycaster finds 1 or more intersections,
we can conclude our object is being hovered (assuming we have 1 “semantic object” in every scene).
let hovered = false;

const raycaster = new Raycaster();
const pointer = new Vector2();

const onPointerMove = (event) => {
  pointer.x = (event.offsetX / canvas.width) * dpr * 2 - 1;
  pointer.y = (event.offsetY / canvas.height) * dpr * 2 - 1;
  raycaster.setFromCamera(pointer, camera);

  hovered = raycaster.intersectObject(object, true).length > 0;
  // here we can trigger an interaction based on the value of `hovered`
  // we can, for example, toggle a CSS class that changes the canvas' styling
  // (e.g. making the object brighter on hover using a CSS filter)
  canvas.classList.toggle('hovered', hovered);
};

canvas.addEventListener('pointermove', onPointerMove);

canvas.addEventListener('click', () => {
  if (hovered) {
    // the player has clicked on the object itself,
    // so we can trigger a click interaction (e.g. collecting an item)
  }
});
This approach has one significant downside: our canvas is still rectangular and
it covers Street View’s internal canvas underneath. The transparent, non-interactive
parts of our canvas are obscuring potentially interactive parts of the Street View panorama.
Especially larger or nearer 3D objects could prevent the player from using the “click-to-go”
navigation. Unfortunately, the only solution I found involves making our canvas non-interactive via
pointer-events: none; and hit-testing it against viewport coordinates manually. It seems this is only possible
if we obtain our canvas’ position with getBoundingClientRect() -
a method which causes layout reflow in browsers, and shouldn’t be called too often, i.e.
certainly not in a frequently called event handler such as pointermove.
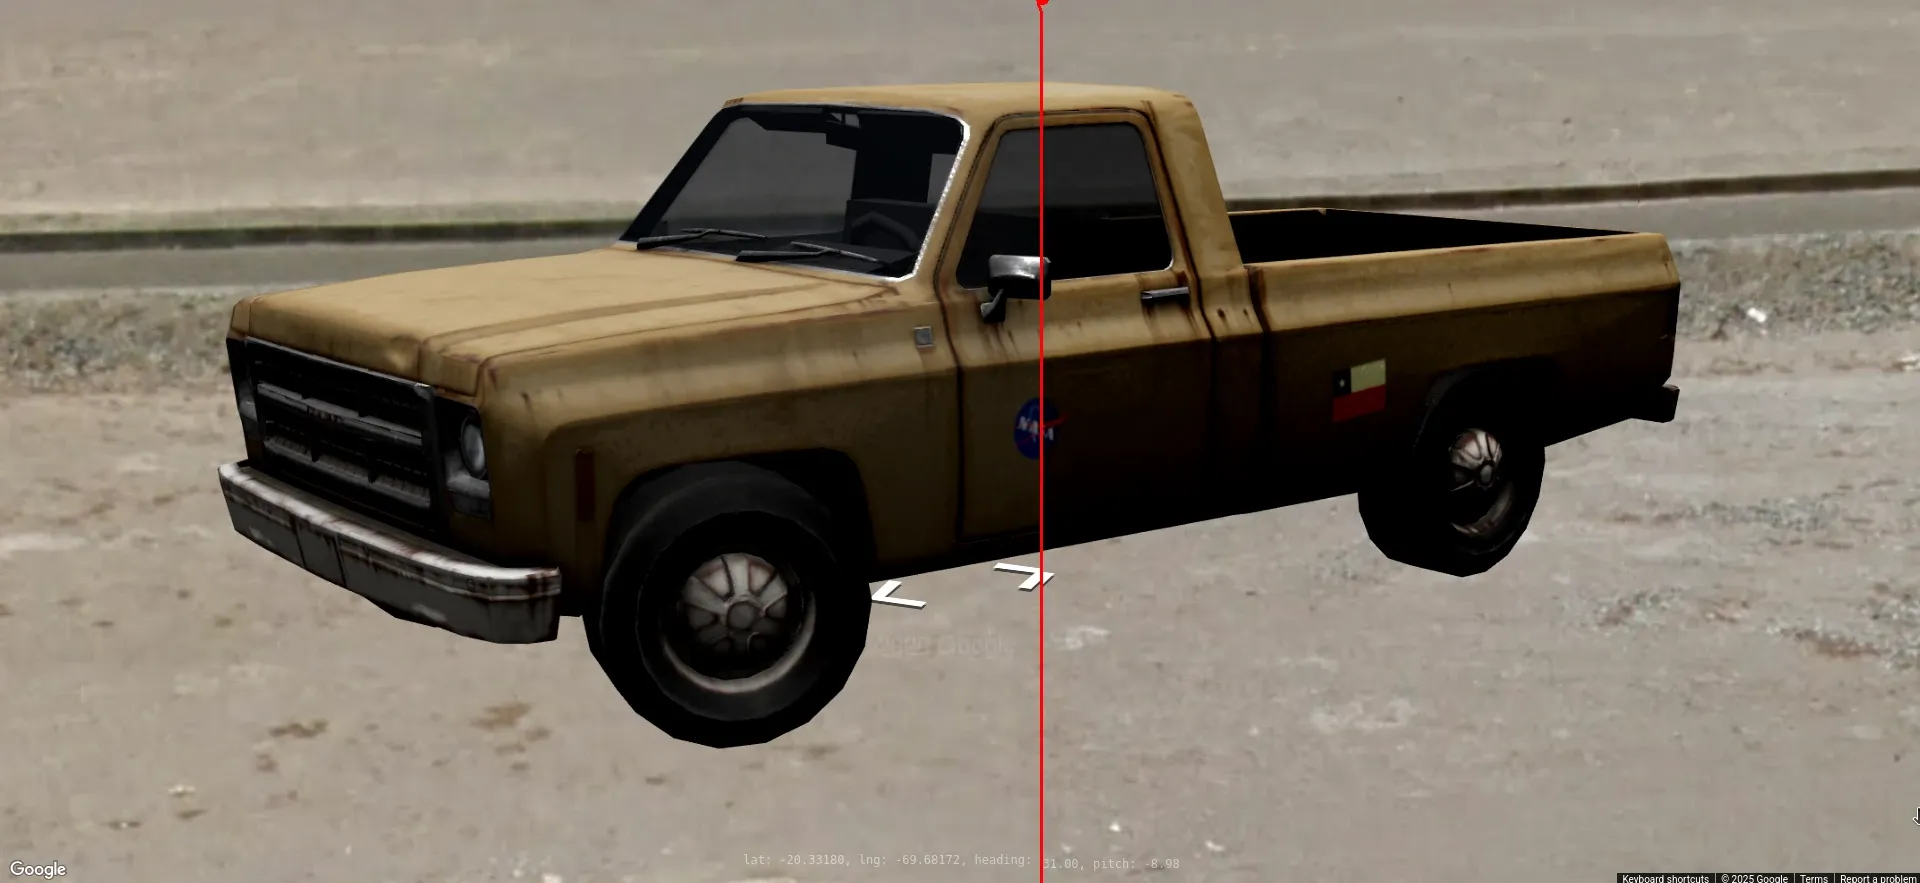
In the video below, I added a red border around the <canvas> to show the transparent non-interactive area around the object.
Adding environment maps
Objects with reflective surfaces need an environment map to look realistic. This map determines what kind of light reflects at different points on the object’s surface. Environment maps are (typically) large images which can be projected onto meshes in various ways. One common projection kind is equirectangular, which happens to be the way Street View stores its 360-degree panoramas.
To render reflective objects in the game, such as the mirror below, we can download the individual image tiles for the given panorama and stitch them together into an environment map texture. Then in Three.js, we simply load the texture and set it as
scene.environment.
import { TextureLoader } from 'three';

const loadEnv = () => new Promise((resolve, reject) => {
  new TextureLoader().load('path/to/my/env/texture', (texture) => {
    texture.mapping = EquirectangularReflectionMapping;
    texture.colorSpace = SRGBColorSpace;
    resolve(texture);
  }, () => {}, reject);
});

// ...
// Three.js scene setup
// ...
scene.environment = await loadEnv();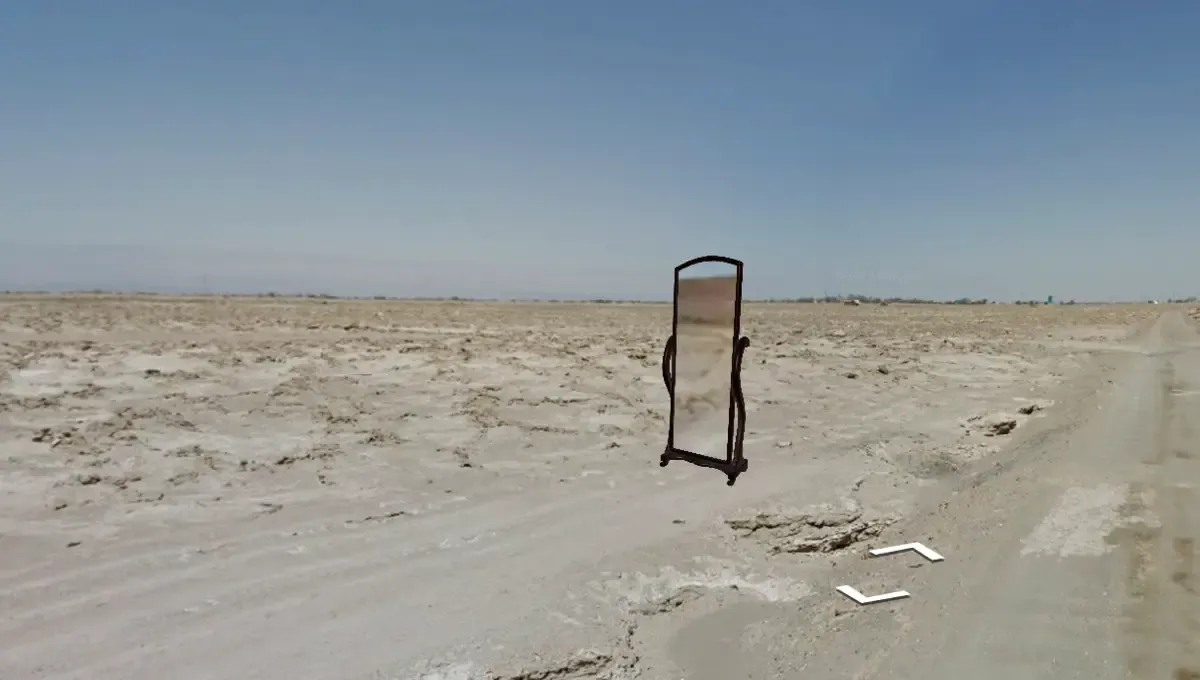
The reflection is blurry due to the mirror’s flat surface (this is an unfortunate issue with equirectangular maps and flat reflective surfaces), but it certainly makes it blend with the environment.
Script to load Street View tiles and stitch them together into an equirectangular map
// cheeky script to stitch together all tiles for a google panorama
// FOR EDUCATIONAL PURPOSES ONLY
// DO NOT EXECUTE THIS CODE

// To fetch the tiles, paste this snippet into your dev tools console (ideally on maps.google.com).
// Run `grab` with the desired Pano ID (you can get this from the Google Maps API).
// Once the console prints "loaded", run `show`. A new tab should open with the full image.

const TILE_SIZE = 512;

let canvas;

const fetchTile = (pano, x, y) => {
  const img = new Image();
  img.crossOrigin = true;
  img.src = `https://streetviewpixels-pa.googleapis.com/v1/tile?cb_client=apiv3&panoid=${pano}&output=tile&x=${x}&y=${y}&zoom=4&nbt=1&fover=2`;

  return img;
};

const grab = async (pano, w, h) => {
  canvas = new OffscreenCanvas(w * TILE_SIZE, h * TILE_SIZE);
  const c = canvas.getContext('2d');

  for (let y = 0; y < h; y++) {
    for (let x = 0; x < w; x++) {
      const img = fetchTile(pano, x, y);
      img.addEventListener('load', () => {
        console.info('loaded', x, y);
        c.drawImage(img, x * TILE_SIZE, y * TILE_SIZE);
      });
    }
  }
};

const show = async () => {
  const blob = await canvas.convertToBlob();
  const url = URL.createObjectURL(blob);
  window.open(url);
};
As per Street View’s terms of service, third parties may not download Google’s own panorama tiles and display them outside of the Street View interface. However, I’d argue that as long as the tiles we use for our environment map are the same tiles currently shown in Street View, the fact that we’ve first downloaded them and served them from our own server/CDN is an implementation detail.
Performance optimisations
Finding Gustavo contains more than 60 3D objects throughout the game. Other games might contain many more. Since our game is served over a network and the player’s device doesn’t have infinite memory, it’s a good idea to make sure we only ever load and render what we need.
Memoize 3D model loading functions
It is quite common for multiple instances of the same object to appear in the game. To avoid sending a network request for every instance, we can memoize our loading functionality. In the snippet below, I’ve wrapped the Three.js GLTF loader in a memoized function:
import { GLTFLoader } from 'three/addons/loaders/GLTFLoader.js';

const memoized = new Map();

const startLoading = (path) => new Promise((resolve, reject) => {
  const loader = new GLTFLoader().setPath(path);a
  // in Finding Gustavo, each 3D object has a folder with a `model.gltf` file in it.
  loader.load(
    'model.gltf',
    ({ scene }) => resolve(scene),
    () => {},
    reject,
  );
});

const loadGLTF = async (path) => {
  if (memoized.has(path)) {
    const scene = await memoized.get(path);
    return scene.clone(true);
  }

  // Memoize the promise, so that in case multiple objects
  // with the same GLTF load at once, they all wait for the single
  // request to fullfill, rather than all sending their individual requests
  // (in case the initial GLTF hasn't been memoized yet).
  const promise = startLoading(path);
  memoized.set(path, promise);

  return promise;
};
Pre-load and pre-render nearby objects
The Google Maps API takes care of showing/hiding Info Windows based on the player’s distance from them.
However, once an Info Window is shown, we want the object to be rendered already. In the position_changed listener
we defined earlier, we can manually open the Info Window, load and render our object once its distance is low enough.
The threshold should be set so the load is triggered at least a few seconds before Street View shows the Info Window.
const LOAD_THRESHOLD = 40; // large enough for the object to (hopefully) load before APPEAR_THRESHOLD is passed
const APPEAR_THRESHOLD = 10; // still larger than Street View's built-in threshold for Info Windows

const loadObject = () => loadGLTF('path/to/the/3d/model');

// panorama.addListener('position_changed', () => {
//    ...
      if (dist < LOAD_THRESHOLD && !object) {
        if (dist < APPEAR_THRESHOLD) {
          // somehow the object hasn't loaded yet, and the InfoWindow is about to pop up
          // so wait until the object is loaded, then render
          await loadObject();
        } else {
          // We already have to load, but no need to render yet
          return loadObject();
        }
      }

      if (!infoWindow.isOpen) {
        if (dist < APPEAR_THRESHOLD) {
          // The window needs to be open in order for Street View to show it
          infoWindow.open({ map: panorama });
        } else {
          return;
        }
      }

      if (!object) {
        await loadObject();
      }

      renderer.render(scene, camera);
//    ...
// });
Release unneeded memory
In WebGL, it’s a good idea to dispose of any allocated memory that isn’t needed anymore. We can modify our conditions above and tidy up once the object is far away again.
if (dist < LOAD_THRESHOLD && !object) {
  // ...
  // see previous snippet
  // ...
} else if (dist >= LOAD_THRESHOLD) {
  renderer.dispose();
}
Improving render quality
It would be very difficult to make the 3D objects blend seamlessly with the Street View panorama. However, we can make a few tweaks to get a relatively good quality look. Firstly, we can add some tone mapping to the WebGL renderer to get more natural colour dynamics.
import { ACESFilmicToneMapping } from 'three';

renderer.toneMapping = ACESFilmicToneMapping; // adjust to taste
Here’s our truck model without (left) and with (right) tonemapping:
We can also increase the resolution of the rendered image independent of the canvas’ size. This is also helpful if we want to support high-DPI screens:
const MIN_DPR = 2;

renderer.setPixelRatio(Math.max(window.devicePixelRatio, MIN_DPR));
Conclusion
In this post, we managed to embed a 3D object rendered with Three.js into a Street View panorama. This unlocks a whole lot of possibilities. Our code can be extended to support animations, modify the 3D scene in real time and render HDRI environment maps.
Here's all the JavaScript code from this post put together (though you might want to structure it differently for your application)
import { ACESFilmicToneMapping, TextureLoader, WebGLRenderer } from 'three';
import { GLTFLoader } from 'three/addons/loaders/GLTFLoader.js';

const LOAD_THRESHOLD = 40; // large enough for the object to (hopefully) load before APPEAR_THRESHOLD is passed
const APPEAR_THRESHOLD = 10; // still larger than Street View's built-in threshold for Info Windows
const MIN_DPR = 2;
const DISTANCE_FACTOR = 0.1;
const MIN_ZOOM = 0.8;

const canvas = document.createElement('canvas');
const memoized = new Map();
const pointer = new Vector2();
const raycaster = new Raycaster();
const renderer = new WebGLRenderer({ canvas, alpha: true, antialias: true });

// The distance only changes when position changes,
// so we store its value for POV changes.
let dist = Infinity; // initial value
let hovered = false;

const startLoading = (path) => new Promise((resolve, reject) => {
const loader = new GLTFLoader().setPath(path);a
// in Finding Gustavo, each 3D object has a folder with a `model.gltf` file in it.
loader.load(
  'model.gltf',
  ({ scene }) => resolve(scene),
  () => {},
  reject,
);
});

const loadGLTF = async (path) => {
if (memoized.has(path)) {
  const scene = await memoized.get(path);
  return scene.clone(true);
}

// Memoize the promise, so that in case multiple objects
// with the same GLTF load at once, they all wait for the single
// request to fullfill, rather than all sending their individual requests
// (in case the initial GLTF hasn't been memoized yet).
const promise = startLoading(path);
memoized.set(path, promise);

return promise;
};

const loadObject = () => loadGLTF('path/to/the/3d/model');

const loadEnv = () => new Promise((resolve, reject) => {
new TextureLoader().load('path/to/my/env/texture', (texture) => {
  texture.mapping = EquirectangularReflectionMapping;
  texture.colorSpace = SRGBColorSpace;
  resolve(texture);
}, () => {}, reject);
});

// ...
// create our Three.js scene and camera
// ...

scene.environment = await loadEnv();

const infoWindow = new InfoWindow({
headerDisabled: true,
position, // this can be a plain `{ lat, lng }` object
content: canvas,
});

panorama.addListener('position_changed', async () => {
const userPosition = panorama.getPosition();
const objectPosition = infoWindow.getPosition();
dist = latLngDist(objectPosition, userPosition);

const { zoom } = panorama.getPov();
canvas.style.scale = (1 / dist) * DISTANCE_FACTOR * Math.max(MIN_ZOOM, zoom);

if (dist < LOAD_THRESHOLD && !object) {
  if (dist < APPEAR_THRESHOLD) {
    // somehow the object hasn't loaded yet, and the InfoWindow is about to pop up
    // so wait until the object is loaded, then render
    await loadObject();
  } else {
    // We already have to load, but no need to render yet
    return loadObject();
  }
}

if (!infoWindow.isOpen) {
  if (dist < APPEAR_THRESHOLD) {
    // The window needs to be open in order for Street View to show it
    infoWindow.open({ map: panorama });
  } else {
    return;
  }
}

if (!object) {
  await loadObject();
}

const dx = userPosition.lat() - objectPosition.lat();
const dy = userPosition.lng() - objectPosition.lng();
// rotate the Three.js Object so it always faces the same direction in the panorama
object.rotation.y = Math.atan2(dy, dx);
// re-render the scene
renderer.clear();
renderer.render(scene, camera);
});

panorama.addListener('pov_changed', () => {
const { zoom } = panorama.getPov();
canvas.style.scale = (1 / dist) * DISTANCE_FACTOR * Math.max(MIN_ZOOM, zoom);
});

const onPointerMove = (event) => {
pointer.x = (event.offsetX / canvas.width) * dpr * 2 - 1;
pointer.y = (event.offsetY / canvas.height) * dpr * 2 - 1;
raycaster.setFromCamera(pointer, camera);

hovered = raycaster.intersectObject(object, true).length > 0;
// here we can trigger an interaction based on the value of `hovered`
// we can, for example, toggle a CSS class that changes the canvas' styling
// (e.g. making the object brighter on hover using a CSS filter)
canvas.classList.toggle('hovered', hovered);
};

canvas.addEventListener('pointermove', onPointerMove);

canvas.addEventListener('click', () => {
if (hovered) {
  // the player has clicked on the object itself,
  // so we can trigger a click interaction (e.g. collecting an item)
}
});
In the next post, we’ll implement a “checkpoint” mechanism which triggers scripted narrative voice-over, sounds and other in-game events as the player moves through the world.